VPN With Port Forwarding: Full Setup Guide
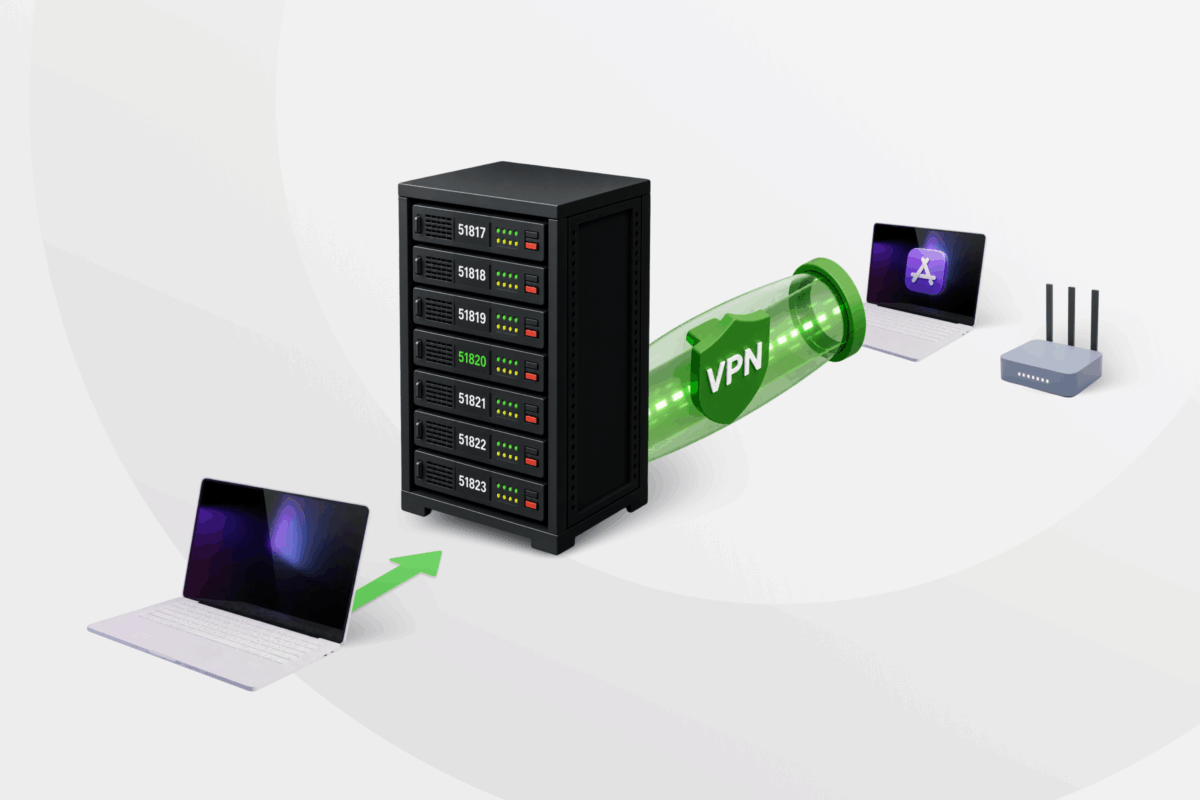
VPN port forwarding opens a port on your VPN server, letting devices outside your home network connect to an app or service on your device without opening that port on your router.
This guide covers how VPN port forwarding works, its common use cases, how to set it up, and how to use it safely.
Tech tip: If you’re looking for a VPN that supports port forwarding, Private Internet Access (PIA) offers easy-to-use, built-in port forwarding on select servers, with no need for extra configuration.
- What Is VPN Port Forwarding?
- How Does Port Forwarding Work?
- What Is VPN Port Forwarding Used For?
- Types of Port Forwarding and When to Use Each
- What Are the Risks of Port Forwarding?
- How to Set Up Port Forwarding With PIA VPN
- How to Set Up Port Forwarding on a Router
- How to Test Port Forwarding
- Why Isn't Port Forwarding Working?
- How to Use VPN Port Forwarding Safely
- FAQ
What Is VPN Port Forwarding?
A port is a numbered entry point that helps your device know where certain network traffic should go.
Forwarding one port doesn’t expose everything on your device. It only creates a path for traffic sent to that specific port. The app still needs to be running and listening on it before it can accept incoming connections.
How Does Port Forwarding Work?
Your router has a public IP address assigned by your internet service provider (ISP). It’s what websites and online services see when you connect.
Each of your devices, like your PC or gaming console, has a private IP address (e.g., 192.168.1.100). Only your local network uses these private addresses, and they all share the same public IP when accessing the internet.
Now, say you want to run a game server on your PC. Anyone who wants to connect to that server will try to connect to your public IP on a specific port (like port 25565 for Minecraft).1 But your router doesn’t know which device (at which private IP) to send that request to, so it blocks it.
That’s where port forwarding becomes useful. You can set it to forward traffic entering through port 25565 to 192.168.1.100 (your gaming device).
What Is VPN Port Forwarding Used For?
Most everyday VPN use doesn’t require port forwarding. It becomes useful when an app or service on your device needs other devices on the internet to start a connection to it. This can be for:
- Peer-to-peer (P2P) file sharing: A forwarded port enables bi-directional connections with both active and passive peers, rather than limiting you to peers who can reach you by other means. This maximizes peer connectivity and helps you reach your ISP’s bandwidth limits more consistently.
- Hosting game servers: If you run a game server, other players need a way to reach it from the internet. Port forwarding can provide that incoming path through the VPN. Joining an online game usually doesn’t require it.
- Remote access: Some remote access tools need direct incoming connections to reach a device on your network. Port forwarding can make that possible, though many modern services use relays or outbound connections instead.
- Home servers and NAS devices: If you host a service at home, such as a media server or file server, port forwarding can make that service reachable from outside your network through the VPN.
- Security cameras: Some self-hosted camera systems use direct incoming connections for remote viewing or management. Port forwarding can provide that access, but exposing a camera interface to the internet can create security risks.
- Raspberry Pi and Internet of Things (IoT) projects: Port forwarding can help when a Raspberry Pi or another device hosts a service that you want to reach. Most everyday smart home devices don’t need it unless they’re running something that accepts direct incoming connections.
- VoIP: Some self-hosted Voice over Internet Protocol (VoIP) setups need predictable incoming connections for call traffic. Whether you need port forwarding depends on the VoIP service and the network’s configuration.
VPN Port Forwarding vs. Router Port Forwarding
VPN port forwarding and router port forwarding both let selected incoming traffic reach a specific destination. The main difference is where you create the forwarding rule.
| VPN port forwarding | Router port forwarding | |
| Where the rule exists | On the VPN provider’s server | On your home router |
| Public IP address used | The VPN server’s public IP address | Your ISP-assigned public IP address |
| Who controls the mapping | VPN provider | You, through your router settings |
| Home router setup required | Usually no | Yes |
| Where traffic goes | Through your VPN connection to the app | From your router to a device on your local network |
| Typical use | Accepting incoming connections through the VPN | Making a service on your home network reachable from the internet |
Types of Port Forwarding and When to Use Each
The type of port forwarding you need depends on why and how you want to forward traffic through specific ports.
Static Port Forwarding
Static port forwarding sends traffic from a specific port to a fixed IP address and device on your local network every time. Once you create the rule, it stays in place until you change or remove it. This is useful for services that need a consistent way to receive incoming connections, such as a home server or another device you want to reach remotely.
Local Port Forwarding
People commonly use local port forwarding with Secure Shell (SSH), a protocol that creates an encrypted connection between two computers. It opens a port on your own device and sends traffic from that port through an encrypted SSH connection to a specific service on the remote side.
For example, you could use it to securely access a database or internal website on another network. It doesn’t open a public port on a VPN server, so it works in a different way from VPN port forwarding.
Remote Port Forwarding
Remote port forwarding works in the opposite direction. It opens a port on the remote SSH server and sends traffic from that port back through the SSH connection to a service on your side.
A developer might use this to make a service running on their own computer reachable through a remote server.
Dynamic Port Forwarding
Dynamic port forwarding also uses SSH, but it doesn’t send traffic to one fixed destination. Instead, it creates a local SOCKS proxy on your device. Compatible apps can send traffic to this proxy, which then carries it through the encrypted SSH connection to different destinations.
This is useful when several connections need to pass through one secure tunnel. Despite the name, dynamic doesn’t mean that the system picks random or temporary ports.
NAT Port Forwarding (Router Port Forwarding)
Network Address Translation (NAT) is the system your router uses to manage traffic between your private home network and the internet. A NAT port forwarding rule tells the router to send traffic arriving on a specific external port to a particular device and port inside your network.
UPnP Port Forwarding
Universal Plug and Play (UPnP) creates the port mappings a compatible app or device needs, without manual setup. The downside is that supported apps can create these mappings themselves, so you have less direct control over which ports your router opens.
Apple developed NAT-PMP to serve the same function,2 while UPnP came from Microsoft.3 You’ll typically find both listed as options in your router’s settings.
Port Triggering
Port triggering only opens an incoming port after a device on your network first makes a specific outgoing connection. The router then keeps the required incoming port or port range open for a limited time.
This is useful for apps that only need incoming connections while you’re using them. Unlike static port forwarding, the rule doesn’t stay open all the time.
Port triggering won’t work for VPN port forwarding. Two reasons: your router can’t see or detect the triggers it’s looking for, since the VPN encrypts your traffic. And even if it could, your external connection goes through the VPN server’s IP address, not your router, so your router’s port rules never come into play.
What Are the Risks of Port Forwarding?
Port forwarding can make online tasks faster or connections more direct, but it also creates security risks, especially if you’re not using a VPN.
- Exposure to the internet: When you open a port, you’re creating a direct path from the internet to a device on your network. Hackers can scan for open ports and try to exploit known vulnerabilities of the service using that port. If successful, they can gain access and steal data, install malware, or take control of your system.
- Bypassing firewalls and NAT: Your router and firewall block most outside traffic by default. Port forwarding overrides that protection, which removes a critical layer of defense. It leaves your system more exposed to probes, exploits, and unauthorized access attempts.
- Privacy breaches via VoIP or smart devices: If you’re forwarding ports for VoIP services, attackers can potentially hijack those connections, eavesdrop on conversations, watch through your camera, or even manipulate your devices themselves.
- DDoS exposure: When you forward ports without protection, you’re exposing your real IP address to the internet. That makes you an easier target for distributed denial-of-service (DDoS) attacks, where attackers flood your IP with traffic to slow down or crash your internet connection.
How to Set Up Port Forwarding With PIA VPN
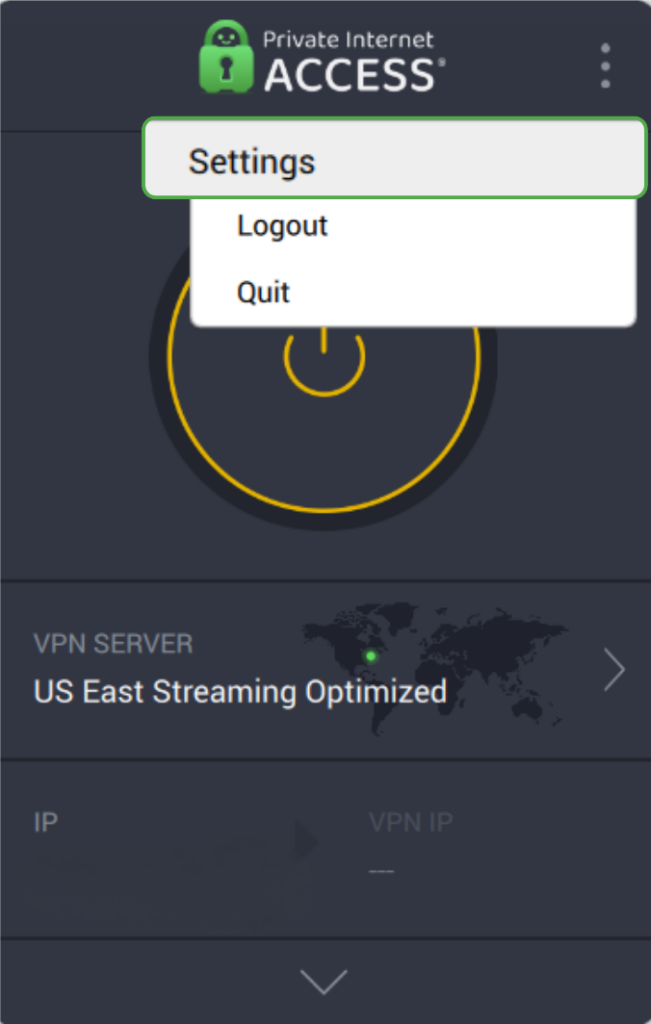
To set up port forwarding with PIA on Windows, macOS, or Linux, first subscribe to PIA and install the native app for your respective operating system. Then:
- Click on the three dots on the top-right to open the menu and select Settings from the dropdown menu.
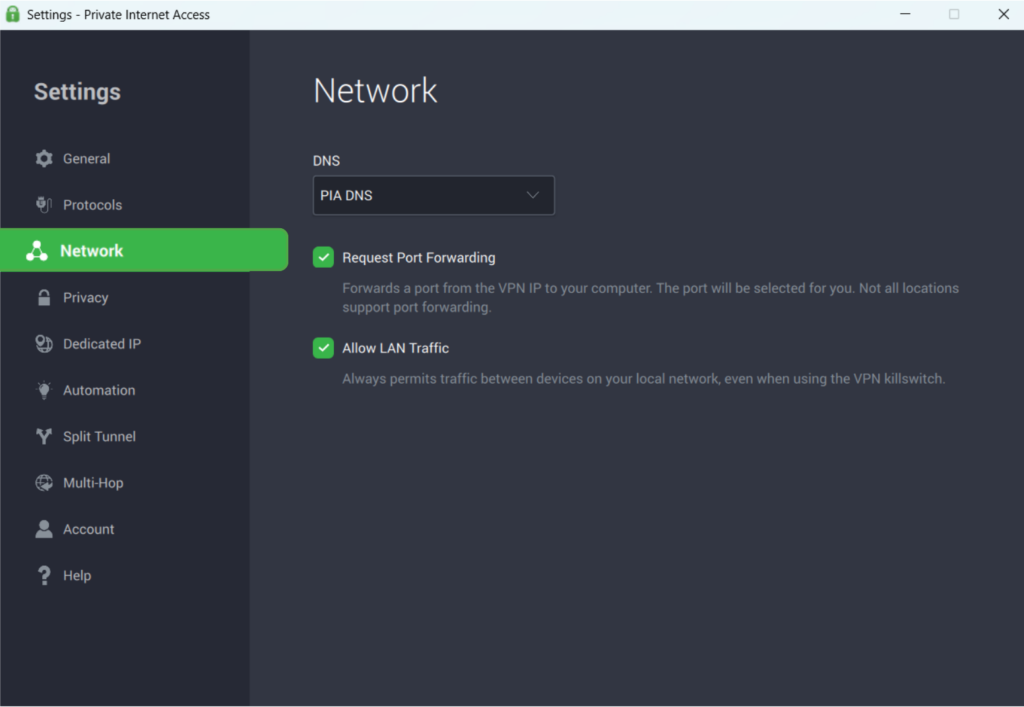
- Choose Network from the menu on the left.
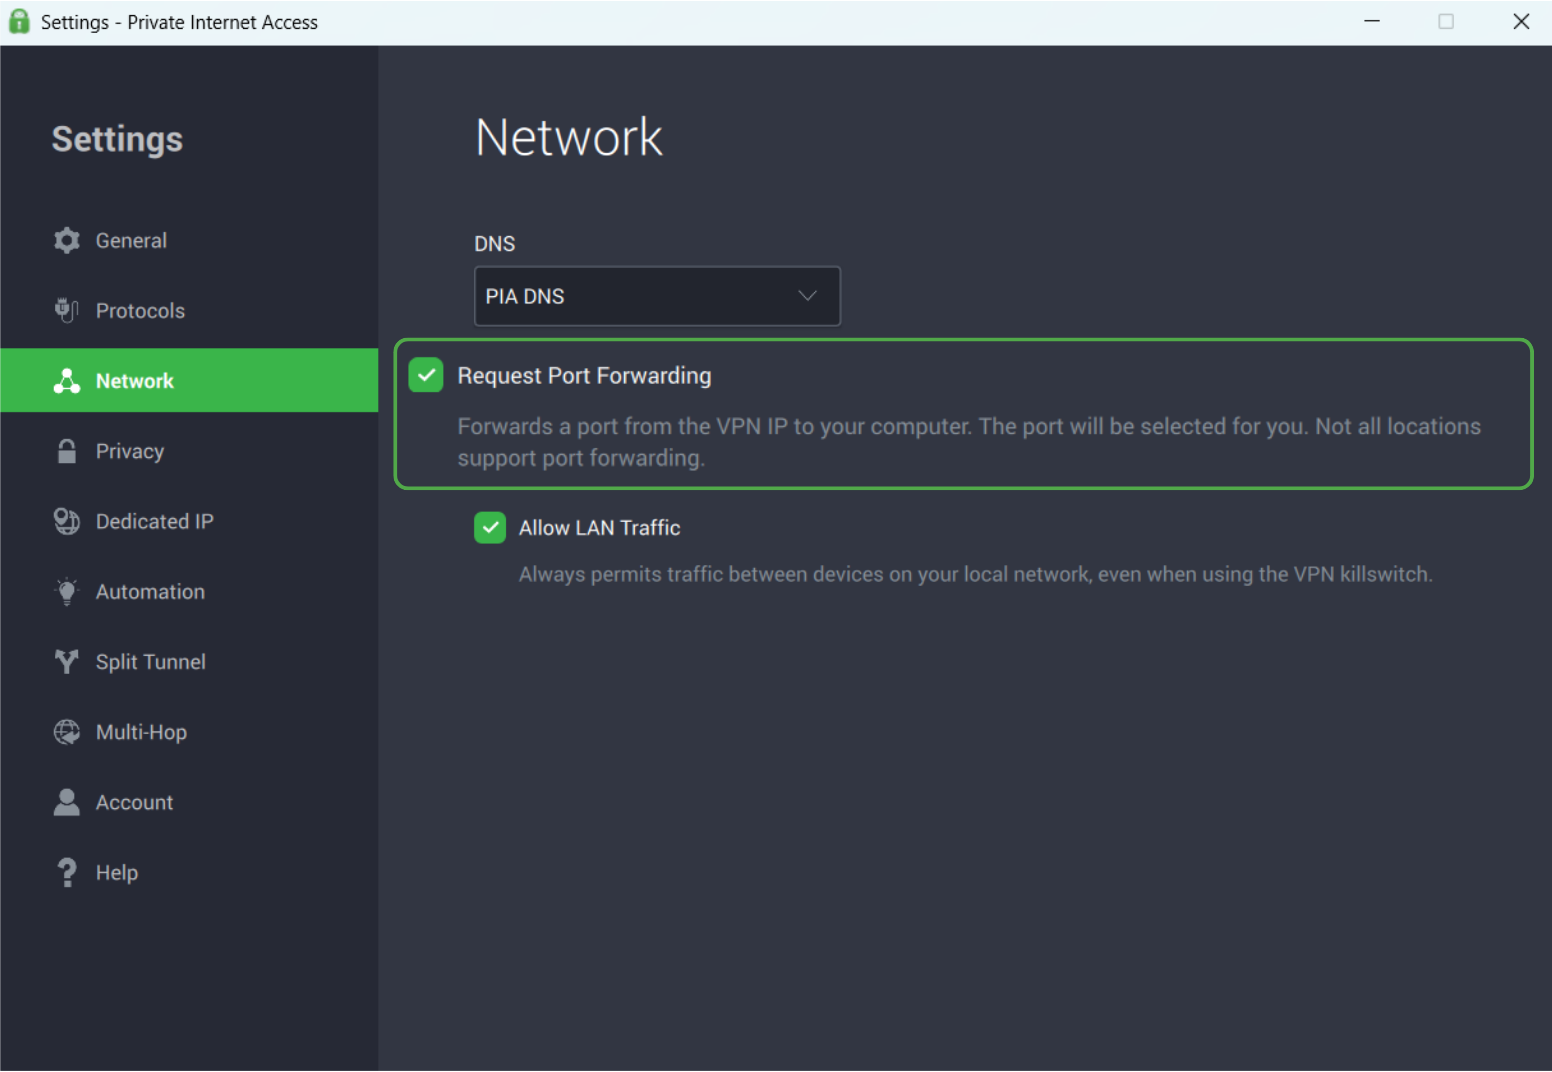
- Check the box next to Request Port Forwarding to activate the feature.
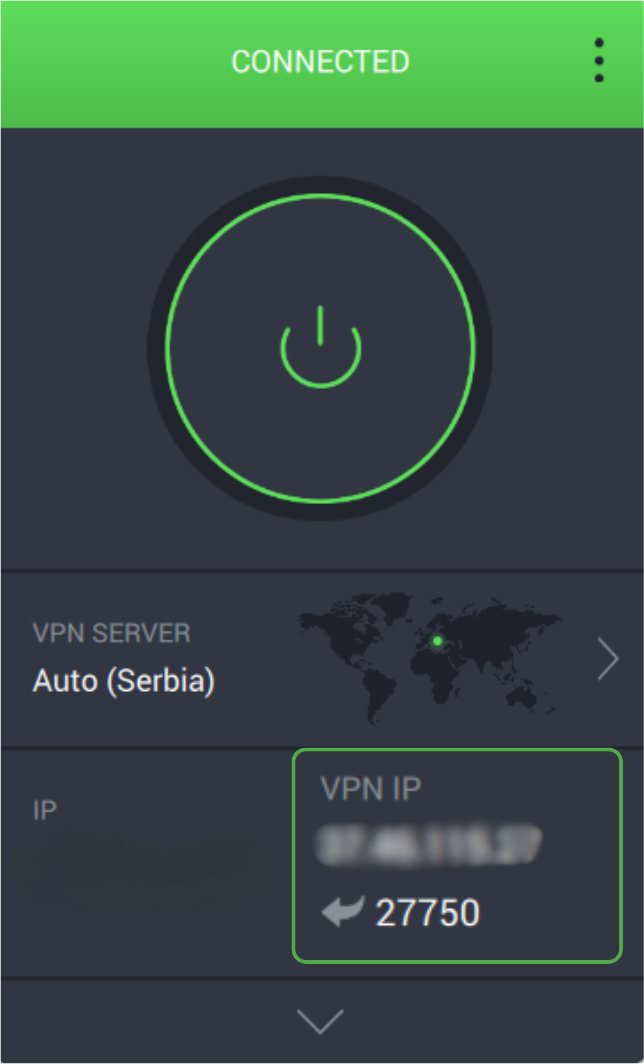
- Connect to a VPN server. Your assigned port will display beneath the VPN IP address on the app interface.
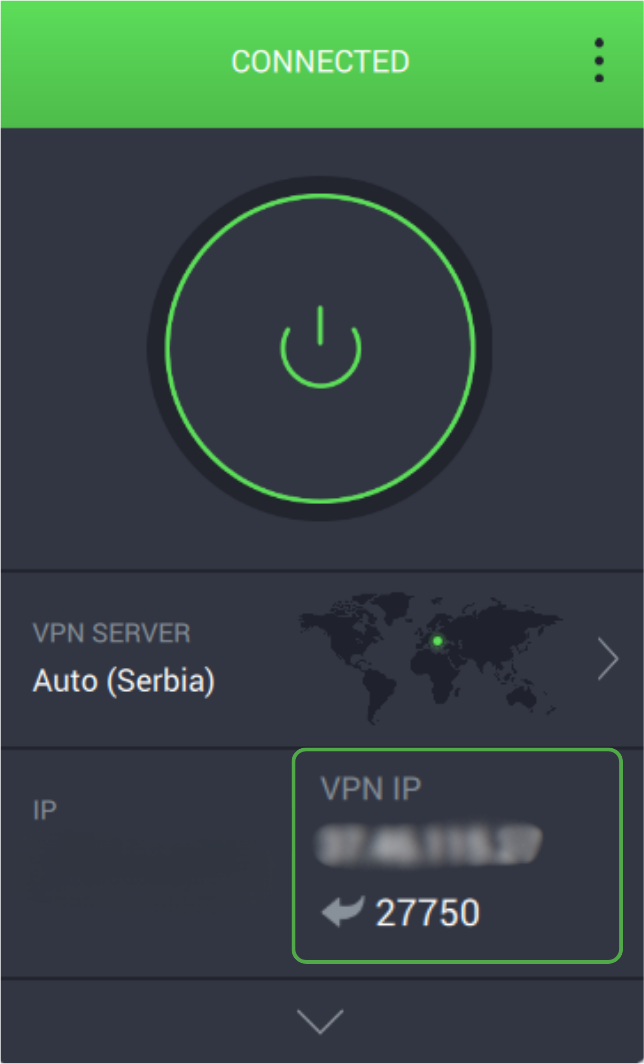
Enable Port Forwarding on Android
To set up port forwarding in the PIA app on Android:
- Tap the three horizontal lines on the top-left to open the menu.
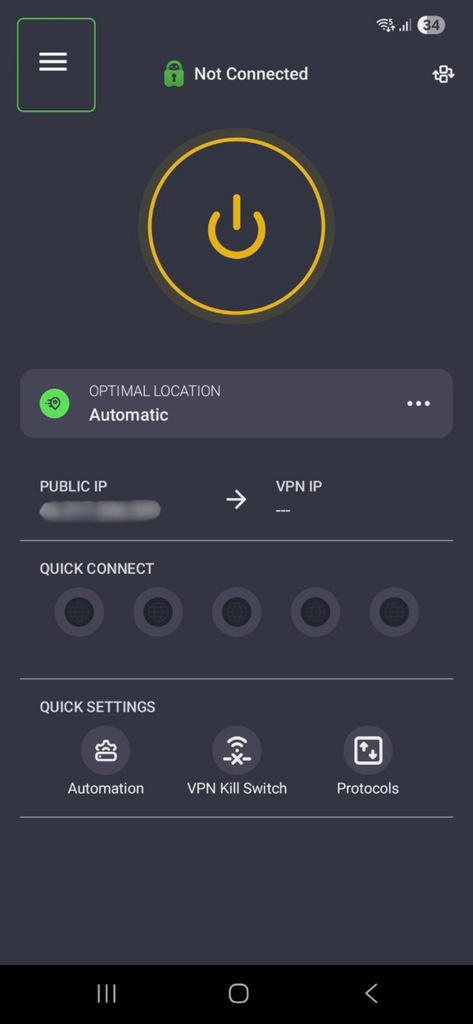
- Select Settings.
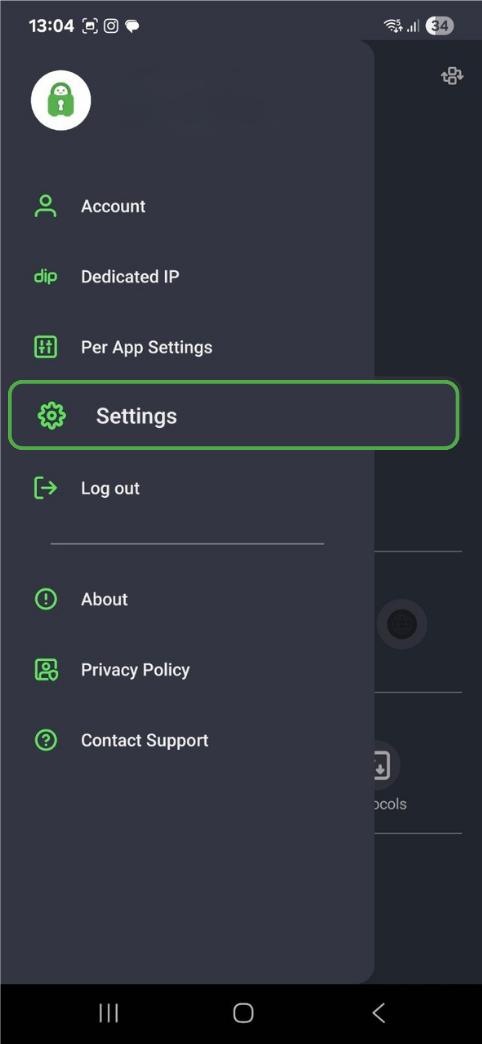
- In the settings menu, go to Networks.
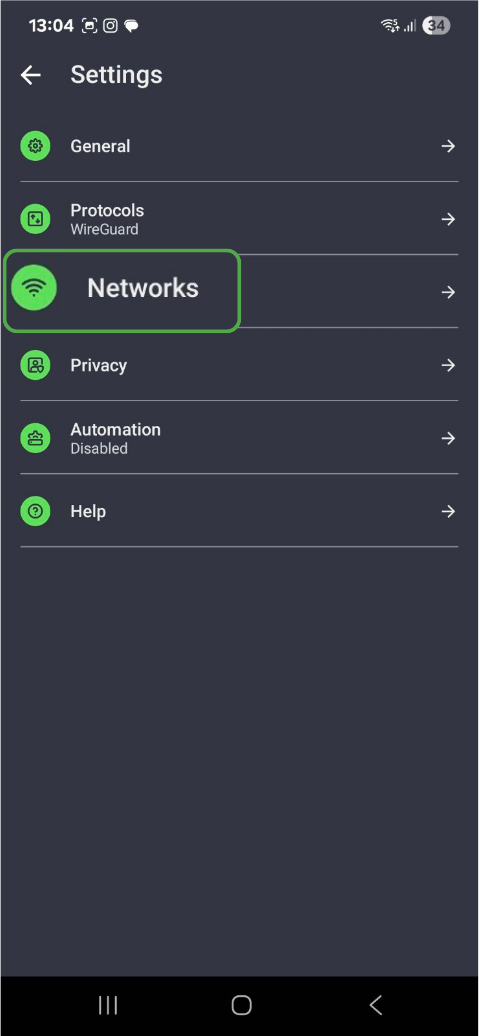
- Toggle on Request Port Forwarding.
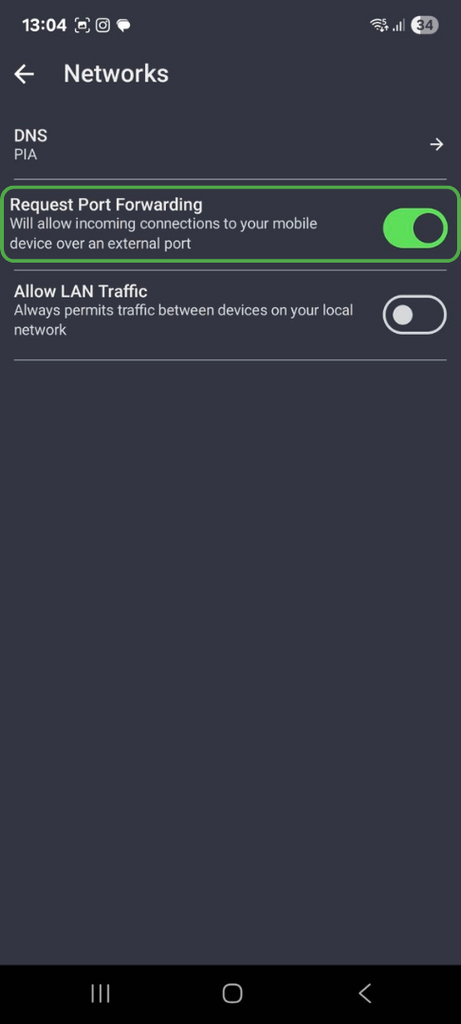
- Connect to a server. You’ll see your assigned port number beneath the VPN IP address on the app interface.
How to Set Up Port Forwarding on a Router
If you have specific network requirements and want more granular control, you can set up port forwarding on your router. Before you start, it helps to have the following information ready:
| What You’ll Need | Where to Find It |
| Your device’s local IP address | Windows: Open Command Prompt, type ipconfig, and press enter. Look for IPv4 Address in the results macOS: Go to System Settings > Network > Details |
| Your router’s IP address | Follow the steps above and look for Default Gateway (Windows) or Router (macOS). This is the address you’ll use to log into your router. It’s usually something like 192.168.1.1 |
| Your router’s login credentials | Check the router label, your ISP’s documentation, or the router manufacturer’s instructions |
| The port you want to forward | Usually found in your game or app’s documentation. For example, 25565 for Minecraft |
| The required protocol | Check whether the service uses TCP, UDP, or both |
The basic process looks something like this:
- Give the destination device a stable local IP address.
- Log in to your router’s admin panel.
- Create a port forwarding rule.
- Allow the required incoming connection through your device’s firewall.
Note: Setting up port forwarding requires some basic networking knowledge. Incorrect configuration can expose you to security risks.
Step 1: Give the Device a Stable Local IP Address
Your forwarding rule needs to keep pointing to the same device. If that device gets another local IP address later, the rule may stop working.
An easy option is to create a Dynamic Host Configuration Protocol (DHCP) reservation in your router settings. This tells the router to keep assigning the same local IP address to that device. The exact menu name varies by router, but you may see terms like Address Reservation, Static Lease, or Reserved IP.
If your router doesn’t support DHCP reservations, you can configure a static local IP address on the device instead. Choose an address that belongs to the same local network but sits outside the router’s DHCP address pool, unless your router documentation tells you otherwise. Also make sure another device isn’t already using it.
On Windows 11
If you can’t reserve an IP address through your router, Windows 11 lets you set a fixed local IPv4 address manually. Use values that match your existing network to avoid connection problems.
- Go to Settings > Network & internet.
- For Wi-Fi, select Wi-Fi > Manage known networks, then choose your network. For Ethernet, select Ethernet, then choose your active connection.
- Next to IP assignment, click Edit.
- Select Manual and enable IPv4.
- Enter the IP address, subnet mask, and gateway that match your local network.
- Enter the DNS server addresses you want to use.
- Click Save.
On macOS
If a DHCP reservation isn’t available, you can assign a fixed local IPv4 address in macOS. The address and other network values must match the network your Mac is connected to.
- Go to System Settings > Network > Wi-Fi.
- Select your active connection and click Details.
- Select TCP/IP and set Configure IPv4 to Manually.
- Enter the IP address, subnet mask, and router address that match your local network.
- If you need to enter DNS servers, select DNS and click on the + sign to add them.
- Click OK.
Step 2: Log Into Your Router
Open a web browser and enter your router’s IP address in the address bar. This is the Default Gateway address you found on Windows or the Router address shown on macOS.
Enter your router administrator username and password. If you don’t know them, check the router label where applicable, your ISP’s documentation, or the manufacturer’s support information. If you previously changed the login details, use those instead.
Step 3: Create a Port Forwarding Rule
In your router’s menu, look for Port Forwarding, Virtual Server, NAT Forwarding, or a similar option. The exact name varies by manufacturer. Create a new rule and fill in the required fields:
- Name: Use something descriptive, such as the name of the game or service.
- External port: Enter the port that incoming connections from the internet will use.
- Internal port: Enter the port the app or service uses on your device. This is often the same as the external port, but it can be different.
- Protocol: Select TCP, UDP, or both according to the service’s requirements.
- Internal IP address: Enter the stable local IP address of the device you configured in Step 1.
Save or apply the rule. Restart the router only if it prompts you to do so. If an app or service requires several ports or a port range, follow its official documentation for the exact ports and protocols to use.
Step 4: Allow Incoming Connections Through Your Device’s Firewall
A router rule can direct incoming traffic to your device, but the device’s firewall may still block it. You’ll need to allow the required app or port through the firewall.
On Windows
- Open Windows Firewall with Advanced Security.
- Go to Inbound Rules, then New Rule.
- Choose Port.
- Select TCP or UDP as required, then enter the specific local port.
- Click Allow the connection.
- Select only the network profiles where you need the rule.
- Give the rule a descriptive name and save it.
On macOS
- Go to System Settings > Network > Firewall.
- If you enabled the firewall, click Options.
- Add the app or service that needs to receive incoming connections, then click OK.
- Set it to Allow incoming connections.
How to Set Up Port Forwarding via UPnP
Universal Plug and Play (UPnP) can create the port-forwarding rules an app or device needs, so you don’t have to enter each rule by hand. Both your router and the app or device must support UPnP for this to work.
- Open your browser and log in to your router.
- Find the UPnP setting. It’s often under Advanced, NAT Forwarding, or a similar menu.
- Enable UPnP.
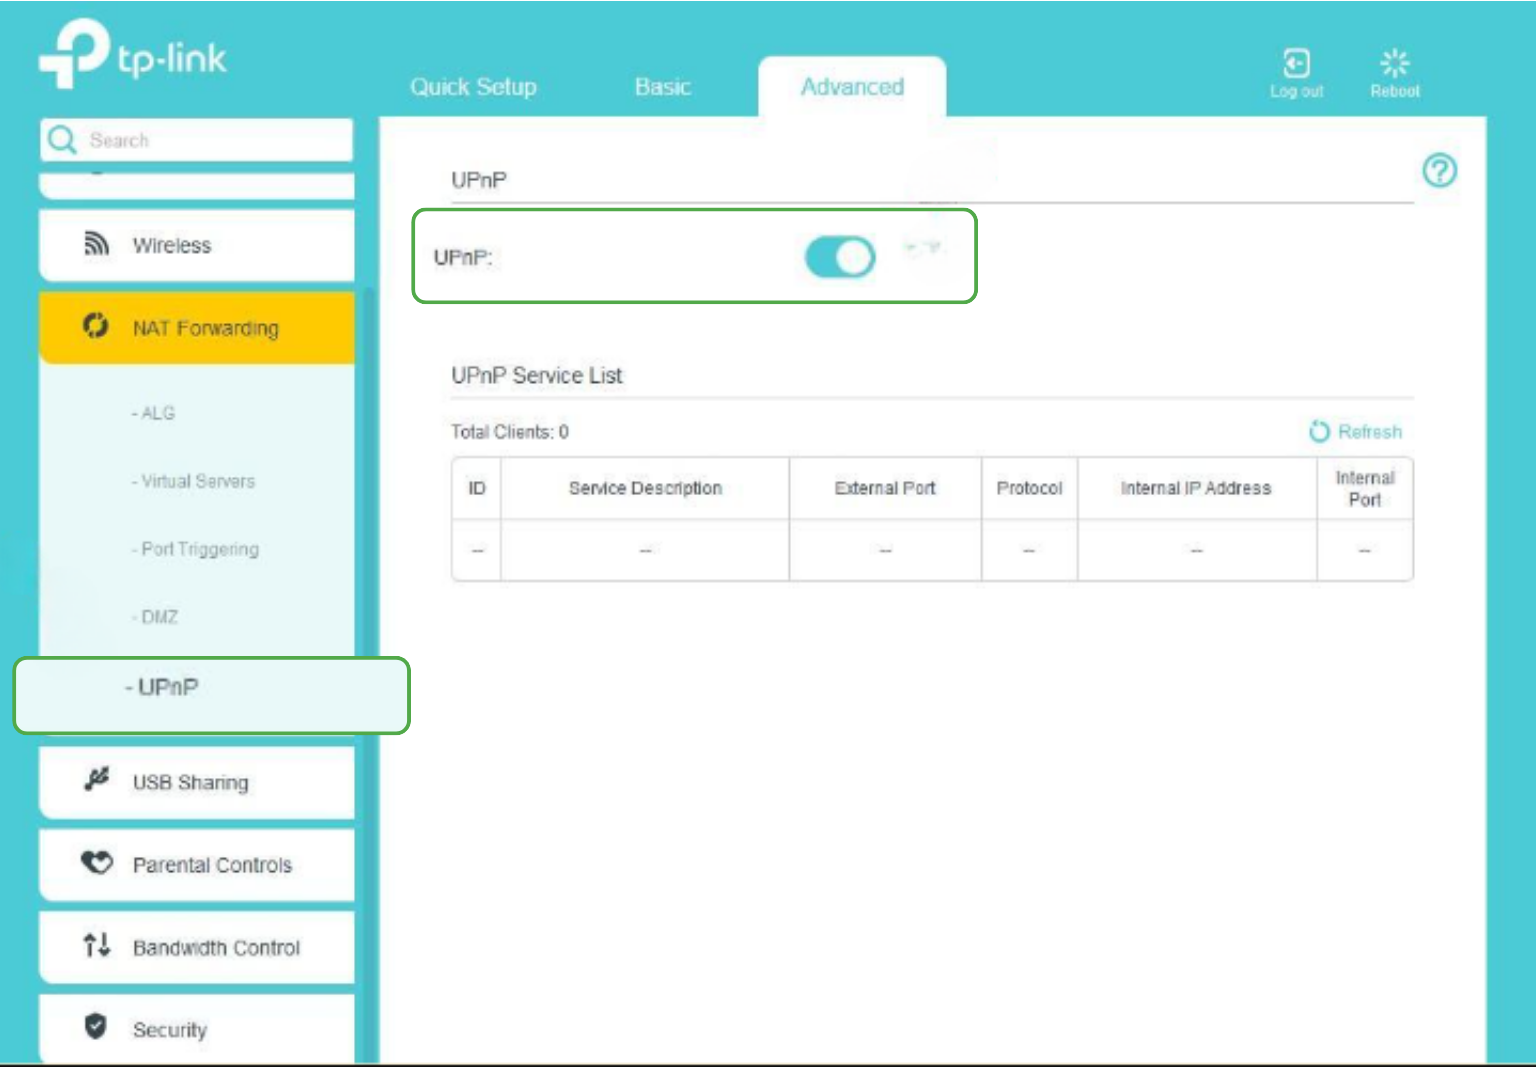
- Click Apply or Save if your router asks you to.
- Make sure you also enable UPnP or automatic port mapping in the app or device you want to use.
Tech tip: UPnP gives compatible apps on your network permission to request port mappings. If you don’t need the feature, you can leave it disabled and create only the forwarding rules you need.
How to Set Up Port Forwarding on a PlayStation
PlayStation doesn’t require manual port forwarding for normal online play when your network is working correctly. It’s often a troubleshooting step for certain NAT or connection problems.
- On your PlayStation, open Settings > Network > Connection Status > View Connection Status and note the console’s local IP address.
- Make sure the console keeps that IP address. The easiest option is to create a DHCP reservation for it in your router, as explained earlier.
- Follow the router setup steps above to create a forwarding rule pointing to your PlayStation’s local IP address, using the ports listed below.
- Go to Settings > Network > Connection Status > Test Internet Connection to check whether you’ve resolved the original connection problem.
Sony lists the following ports to try opening when troubleshooting certain PlayStation Network connection errors on PS5:4
- TCP: 80, 443, 3478, 3479, 3480
- UDP: 3478, 3479, 49152–65535
Use only the ports relevant to the issue you’re troubleshooting. For a specific game, check its official support documentation because its port requirements may differ.
Related: How to Change NAT Type on PS5 and Troubleshoot
How to Set Up Port Forwarding on Xbox
Manual port forwarding can help when your Xbox has a NAT or multiplayer connection problem that UPnP isn’t resolving. Create the forwarding rules on your router and point the connection to your Xbox’s local IP address.
- On your Xbox, go to Settings > General > Network settings > Advanced settings.
- Note the console’s IP address, then log in to your router and create a DHCP reservation for your Xbox so it keeps receiving the same local IP address. The setting may be called Address Reservation or Reserve IP.
- Follow the router setup steps above to create a forwarding rule pointing to your Xbox’s reserved local IP address, using the ports listed below.
- On your Xbox, return to Settings > General > Network settings and select Test NAT type to check whether the NAT or multiplayer issue has improved.
Xbox One network services use the following ports:5
- UDP: 88, 500, 3544, 4500
- TCP and UDP: 53, 3074
- TCP: 80
A specific game or newer Xbox service may use other or additional ports. Check the official support documentation for the game or service you’re troubleshooting before creating extra forwarding rules.
How to Test Port Forwarding
You can use an online port checker, such as CanYouSeeMe.org or PortChecker.co, to see whether a forwarded TCP port can be reached from the internet. Before testing, make sure the app or service that uses the port is running. If nothing is listening on that port, the checker may report it as closed even when you set up the forwarding rule correctly.
For VPN port forwarding with PIA, make sure you’re still connected to the PIA server location that assigned the port. Test the port displayed in the PIA app, and make sure the app or service you want to reach is listening on that same port.
If you use a browser-based checker, the browser also needs to be using the VPN connection so the test targets the VPN-facing IP address rather than your ISP-assigned IP address.
If the service uses UDP, a standard browser-based port checker may not give you a reliable result because many of these tools test TCP connections. In that case, use the app’s built-in connection test or another tool designed for the protocol you’re testing.
Why Isn’t Port Forwarding Working?
If port forwarding isn’t working after setup, the problem could be somewhere between the forwarding rule and the app that should receive the connection. Check these common causes first:
- Your VPN server or location doesn’t support port forwarding: Some VPN providers only offer the feature on certain servers or regions. Make sure the server you’re connected to supports it.
- Your app is using the wrong port: The listening port in your app needs to match the port your VPN assigned. If the numbers don’t match, incoming traffic won’t reach the app.
- The assigned VPN port changed: Some VPNs assign a new forwarded port after you reconnect. Check the current value and update your app if needed.
- The app isn’t listening on the port: A forwarding rule only creates a path for incoming traffic. The app or service still needs to be running and actively listening on that port.
- The app is using the wrong network interface: Some apps let you choose which network adapter they use. If the app is bound to your normal connection instead of the VPN interface, forwarded traffic may not reach it.
- Your firewall is blocking the connection: A correct forwarding rule can still fail if your device’s firewall rejects the incoming traffic. Make sure the firewall allows access for the required app or port.
- The protocol doesn’t match: Some services use TCP, while others use UDP. If you set the forwarding rule or app to the wrong protocol, the connection may fail even when the port number is correct.
- Another app is already using the port: Two apps generally can’t listen on the same IP address and port with the same protocol at the same time. Close the conflicting app or use another port if the service allows it.
- Your router rule points to the wrong local IP address: If your device received a new local IP address, the rule may still point to the old one. A DHCP reservation helps prevent this.
- You’re behind double NAT: This happens when your connection passes through two devices that both perform NAT, such as an ISP gateway and your own router. Forwarding a port on the inner router may not work if the outer device still blocks the incoming connection.
- Your ISP uses carrier-grade NAT (CGNAT): With CGNAT, your ISP shares a public IPv4 address among multiple customers.6 Your router doesn’t control the ISP’s outer NAT system, so a forwarding rule on your router can’t open a port through that layer.
How to Use VPN Port Forwarding Safely
A VPN encrypts traffic between your device and the VPN server, but you still need to secure the app or service using the forwarded port. These steps help limit unnecessary access:
- Forward only the ports you need: Some apps require more than one port. Avoid leaving unused ports open.
- Keep the app or service updated: Install security updates for any software that accepts incoming connections through the forwarded port. If you’re running a server, keep its underlying software updated too.
- Use strong authentication: Protect remotely accessible services with a strong password or another secure login method where available. For SSH, key-based authentication is generally preferable to password-only access.
- Keep your firewall enabled: Allow only the app or traffic that needs the forwarded port instead of turning the firewall off. If the service supports access rules, you can also limit connections to specific IP addresses.
- Use encrypted protocols where possible: Port forwarding creates a path for traffic, but it doesn’t encrypt the connection from the remote device to your app. Use protocols such as HTTPS or SSH when the service supports them.
- Keep the app on the VPN when necessary: Some apps let you choose which network interface they use. If you want the service to stay reachable only through the VPN, bind it to the VPN interface where supported. PIA’s Kill Switch can also block internet traffic if the connection drops unexpectedly.
- Disable port forwarding when not needed: If you stop using the service, turn off the forwarding rule or remove the mapping. This avoids leaving an unnecessary incoming path active.
FAQ
What VPN providers allow port forwarding?
PIA VPN supports port forwarding for Windows, macOS, Linux, and Android devices. Enabling port forwarding with PIA is as easy as toggling a switch, and our strict No-Logs policy means we never track your online activity.
Does port forwarding increase speed or reduce ping?
No. Port forwarding doesn’t make your internet connection faster or lower your ping by itself. It can improve connectivity in apps that need incoming connections, which may help in some P2P or game-hosting situations.
What can you use instead of port forwarding?
It depends on what you’re trying to access. Some services use relay servers, reverse tunnels, or private network tools that let devices connect without opening a normal inbound port on your router.
Can port forwarding work behind CGNAT?
Regular router port forwarding usually won’t work behind carrier-grade NAT (CGNAT) because your ISP controls the public-facing connection. A VPN with its own port-forwarding feature can still accept incoming connections through the VPN server instead.
How do I test port forwarding?
You can test if port forwarding is successful by using a port checking tool. Simply enter the port number you used, and the tool will let you know if port forwarding was successful. If you’re port forwarding via the PIA VPN app, you will see the port number beneath the VPN IP address on the main interface.
Resources:
- Download the Minecraft: Java Edition server – Minecraft
- NAT Port Mapping Protocol (NAT-PMP) – ietf.org
- Microsoft Introduces Universal Plug and Play Initiative To Help Consumers Get More From New and Existing Home Electronics – Microsoft
- How to fix WS-116520-5 – PlayStation
- Network ports used by the Xbox network on the Xbox console – Xbox
- IANA-Reserved IPv4 Prefix for Shared Address Space – ietf.org
